
As an event organizer, you know the magic lies in those seamless, unforgettable moments your attendees will cherish. However, behind every successful event is the complexity of planning all the details to create an effortless experience for everyone involved.
You can pave the way for your guests to effortlessly engage, connect, and immerse themselves in the event by carefully considering each logistical detail. This attention to detail helps turn mere gatherings into memorable experiences that resonate long after the final goodbyes.
To enhance this seamless experience, consider introducing ticket booths and cashier booths at your event. These innovative structures support the attendee journey by helping you manage ticketing and cashier services for a stress-free experience.
This event management guide discusses how these solutions can streamline your event.
Event entry management determines how attendees experience your event. It's the first operational point that indicates how organized and safe your event is. Below are the advantages of effective event access control:

An efficient entry system starts with a clear understanding of how people move through an event space. A few factors and considerations can help you prevent congestion and maintain safety.
Before positioning any booth or barricade, map the attendee journey from the first touch point. This includes where visitors arrive and how they move toward the entry area. Mapping helps identify natural flow lines and potential pressure zones.
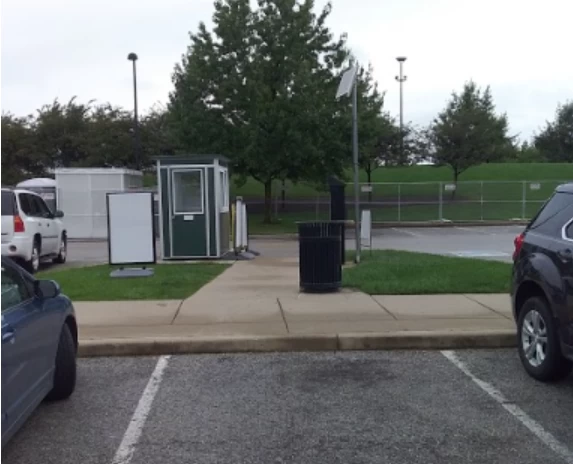
For example, a parking area that feeds into a single walkway can produce a predictable surge pattern, while multiple dispersed access points may require broader visibility and staff coordination. When you visualize this journey, consider how it impacts other areas. An adjustment in one section — such as moving a ticket booth closer to the main gate — can change the timing and density elsewhere.
Once you have that map, walk it in person if possible. Site walks provide insights you can use to guide booth spacing and crowd control.
Once you've mapped the journey, guide it visually. Wayfinding and signage give attendees confidence about where to go and what to expect next. Attendees should be able to identify the correct lane or booth from a distance of a few feet.
Use consistent language and iconography throughout the site. When signs differ in terminology or tone, guests may hesitate, and hesitation creates delays.
Additionally, position directional signs before the decision point. People need time to read and react while in motion. Consider backlighting or reflective materials to help visibility in early morning or evening light.

Path design turns your mapped journey and signage plan into a functional route. Ideally, attendees should move at a comfortable pace, so every turn or narrowing in your layout should have an operational reason.
Barriers define these routes physically and inform perception and flow. Consider modular fencing that allows flexible reconfiguration as attendance patterns shift. Maintain minimum widths that accommodate expected volumes. For example, you can use 36 inches for standard lanes and 48 inches for accessible lanes.
Where lines merge, create buffer zones that allow people to self-organize before entering the next checkpoint. Avoid sharp and enclosed corners, which limit sight lines and can make queues feel longer than they are.
Not all guests require the same entry process. Lane segmentation separates traffic by function to improve throughput and reduce confusion.
Determine your main entry categories, including:
Designate dedicated lanes for each group, clearly labeled from a distance, to ensure a smooth flow of traffic.
Consider making it visually obvious where someone belongs the moment they approach. Where possible, use color-coded signage or banners that match the colors of wristbands or tickets. This simple alignment between ticket type and lane visuals prevents last-minute lane changes that slow attendees and staff down.
Lane segmentation also supports safety by dispersing crowd density. By assigning attendees to smaller, purpose-based channels, you minimize congestion and improve oversight. For instance, a VIP or ADA lane may have lower throughput but higher service interaction, while general admission lanes prioritize volume. Planning for these differences ensures balanced staffing and equipment allocation across entry points.
Each entry cluster should have a designated lead responsible for monitoring throughput, managing breaks, and communicating changes to security or logistics teams. Therefore, reliable communications systems are critical. Radios or headsets allow supervisors to adjust staffing between lanes or signal for support when one area begins to back up. Some teams may use digital dashboards that display live entry counts or scanning speeds.
Establish brief but clear protocols for escalation. If an entry scanner fails, or if a sudden influx occurs, your team should know who can authorize a lane switch or temporary hold.
Each booth serves a purpose in the entry ecosystem. Whether it's handling transactions or supporting security operations, thoughtfully chosen and zoned booths create a predictable, efficient flow.
Before deciding on booth models or quantities, clarify what each unit needs to accomplish and where it fits within the larger site plan. Functions typically fall into a few categories:
Cashier booths prioritize speed and efficiency. They feature:
The best ticketing setup for events should allow staff to move between tasks while maintaining visibility of the line. Good lighting and ergonomic counter height may improve accuracy and reduce fatigue over long shifts.
Meanwhile, security booths focus on control and visibility. They may include elevated positions for line-of-sight monitoring and integrated communications with central command. When exploring security booths, consider space for staff to conduct bag inspections and store equipment.

Once booth function and zoning are clear, the next step is to determine how many stations are needed to handle the expected attendee volumes. You can use the following formula:
For example, if you anticipate 2,400 attendees arriving over a two-hour window, and each cashier can process 120 transactions per hour, the calculation is:
Always round up and then validate against peak arrival periods. Average flow alone can underestimate demand, so consider a 15% to 20% buffer to account for surges.
The booths' infrastructure determines how effectively your staff can operate the entry process. Various aspects intersect to inform operational reliability and attendee experience. Investing in these elements reduces bottlenecks and ensures compliance.
Most fixtures depend on consistent electricity. A brief outage can delay security checks and cause line buildup. These potential risks require redundancy. Consider battery backups or portable generators to create a safety net.
Proper illumination speeds up scanning and creates a sense of order. Task lighting should focus on counters and transaction areas to minimize glare, while ambient or flood lighting ensures pathways remain clearly visible. For evening or low-light conditions, consider adjustable LED lighting for energy efficiency and flexibility.
A well-connected booth is a productive booth. Operations rely on ticket validation and communication devices, which require stable connectivity.
Connectivity options include:
Accessibility is a legal requirement and a best practice for boosting the guest experience. Entry booths must meet ADA standards for accessible design, which include:
Safety measures support operational stability and guest confidence. Every booth cluster should incorporate multiple layers of protection. Consider the following:
Whether you buy or rent a booth, aligning your budget and timeline with the event's requirements ensures you deploy resources efficiently and maintain quality.
Renting booths makes sense for pilot events, one-off events, or locations where site-specific conditions change seasonally. If your event rotates venues or needs vary throughout the year, renting provides flexibility.
Using venue-provided services can reduce mobilization challenges and setup time. Standard rental units typically take two weeks to be deployed to your venue. However, scheduling approvals, coordinating staff, and integrating security screening technology with public safety partners may add to the lead time. Typical planning windows for rented booths range from several weeks for standard activations to a few months when specialized equipment or permits are involved.
Renting is also advantageous when your event's peak attendance is unpredictable. Temporary deployments allow you to scale capacity up or down, adapt to unforeseen changes, and manage costs.
Owning booths is most practical for recurring venues, tours, or campus facilities where consistent presence and customization can deliver clear value. Purchasing reduces recurring rental fees and associated labor costs, while providing control over design and integration of add-on features.
These investments pay off over time by enabling quick setups and readiness for extreme conditions. Ownership also allows your team to refine booth layouts and operational procedures across events.
Guardian Booth designs and manufactures booths to meet your event's requirements. From custom sizing and integrated technology to ADA-compliant counters and security features, our solutions simplify operations and help your team maintain a steady flow during your event.
Each booth is built for convenience and flexibility. Our team can deliver standard units within two weeks of order confirmation, while custom configurations are typically completed in four to six weeks.
We offer competitive pricing and free shipping on standard units. Every structure is engineered for reliability and safety.
Contact us today to learn how we can streamline your next event.